The Cathedral Windows table topper is complete — and looks very nice on our foyer drop-down secretary. This was a quicker project than I expected . . .

Cathedral Windows Table Topper
I was intrigued by several quilts I saw with the block “cathedral windows”. Sooo since I’m still in “try anything” mode, I decided to make a table topper for our secretarial desk that Mike built.
I used a cream colored background with a layer cake (42 10” squares) from Moda called “Clover Meadow” by Jan Patek Quilts. I’ve only use a couple of the 10” squares, so the balance will go into my stash of quilt fabrics. The topper is in progress. Here’s a picture; the left is a closeup of the window and the right is a long shot of the entire topper. I’m likely to finish this in the next couple of days. . . .

Wonky Block Quilt - Complete !!
The wonky block polka dot quilt is complete !! I really enjoyed working on this quilt. This is my first experience with sashing and it went pretty well, I think the black sashing and binding add a lot of pizzazz to the quilt. I found a particularly good video (from the Missouri Star Quilt Company) about binding and for the first time, I was pleased with the binding. For the moment, it lives in our bedroom on a chair. . .
The first picture shows the front of the quilt; the second shows a bit of the backing. . .

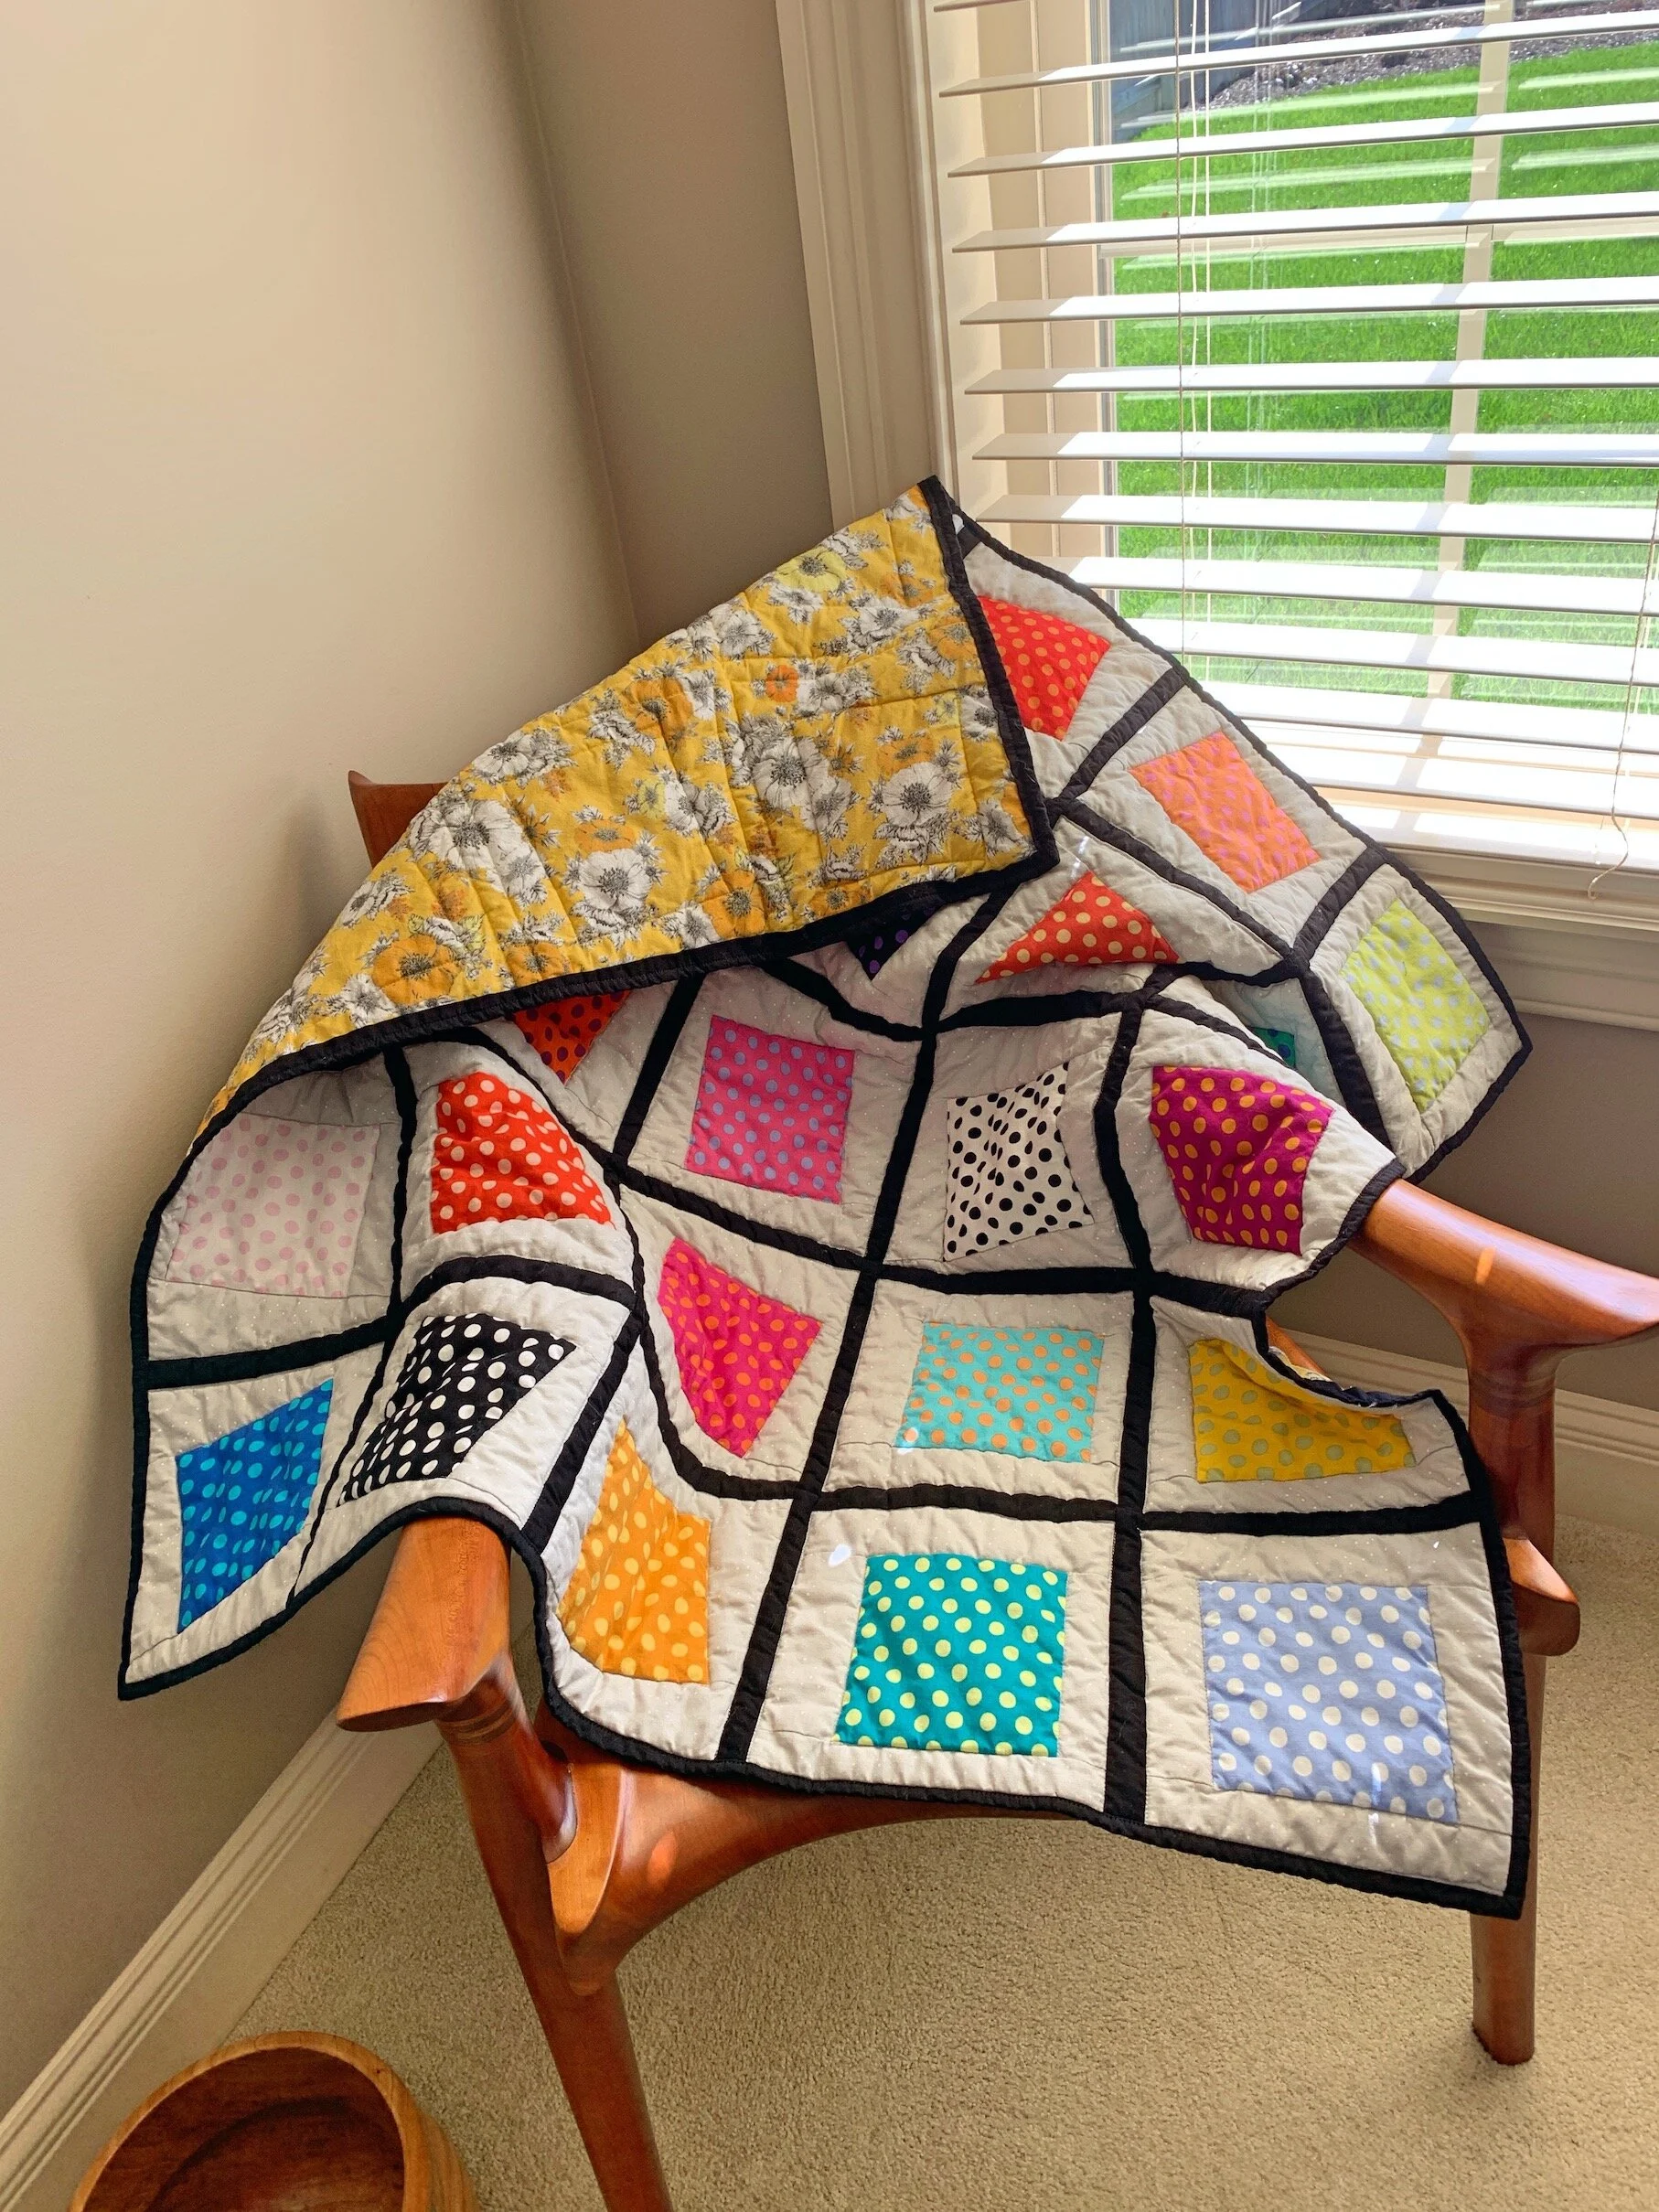
"Wonky" Block Quilt
After I completed the 25 blocks for this quilt I laid the blocks on my “design wall” (aka the living room floor) and rearranged them until I got the most pleasing layout.

I then sewed the rows together adding narrow black sashing between blocks and rows. Putting the quilt top together went more quickly than I expected.
Now I’m off to create the quilt sandwich and then on to the quilting. . .

"Wonky" Block Quilt Begins
My next quilt will be a “wonky” block quilt using a polka dot charm pack (pre-cut five inch squares). I was inspired by this blog post and loved the look of the tilted blocks. Here’s a picture of the fabrics I’ve chosen. The polka dot fabric has about ten different colors, so this will be another bright quilt.

Table Topper Complete !
The table runner/topper is complete ! I finished the quilting on February 23, 2020. My husband, who requested this, is delighted !! He designed and built the dining room table and thinks the topper enhances the cherry wood he used.


Top is complete
The Churn Dash table runner top is complete !! You might notice that the border is now blue, rather than the yellow-green in my last post. The topper is 60 inches long and 11 inches wide.
Now I have to create the quilt sandwich. This entails piecing together the batting (I haven’t done this before), create the quilt back (I must piece together the back which I also haven’t done before) and finally put together the top, batting and back — the sandwich. I use a spray adhesive to create the sandwich (the adhesive washes out). And then I’ll quilt the table runner. There’s much to be done on this project
Table Topper WIP
I’m making good progress on the table topper. I have all the blocks sewn together and am ready to create the sashing (the horizontal fabric between the blocks) and the border (the fabric around the edge of the topper). We thought this yellow-green would be a nice contrast but it’s too much of a contrast; I’ve ordered some blue-green fabric since our local fabric stores didn’t have anything I thought would work.
The picture on the left shows the blocks, with the proposed background fabric, laid on the table and the right is a close-up of a couple of the blocks. I really like the yellow-green fabric, so I might use it as the backing and possibly as the quilt binding.

Churn Dash Table Topper Begins
You might recall that the fabric we’d chosen for the table topper (aka table runner) was a muddy colored mess when I put together the sample block. I went off to the fabric store and selected the fabric you see below.
On the left is the sample block that I created to see if the colors were right - and they were ! On the right is a selection of fabric I’ll use to create the blocks.
I have a lot of cutting and sewing to do - there are three rows in each block, each of which has six elements to be cut and sewn together. This is the most intricate block I’ve created in my short time as a quilter. I’ll report back as I move through the project. . .

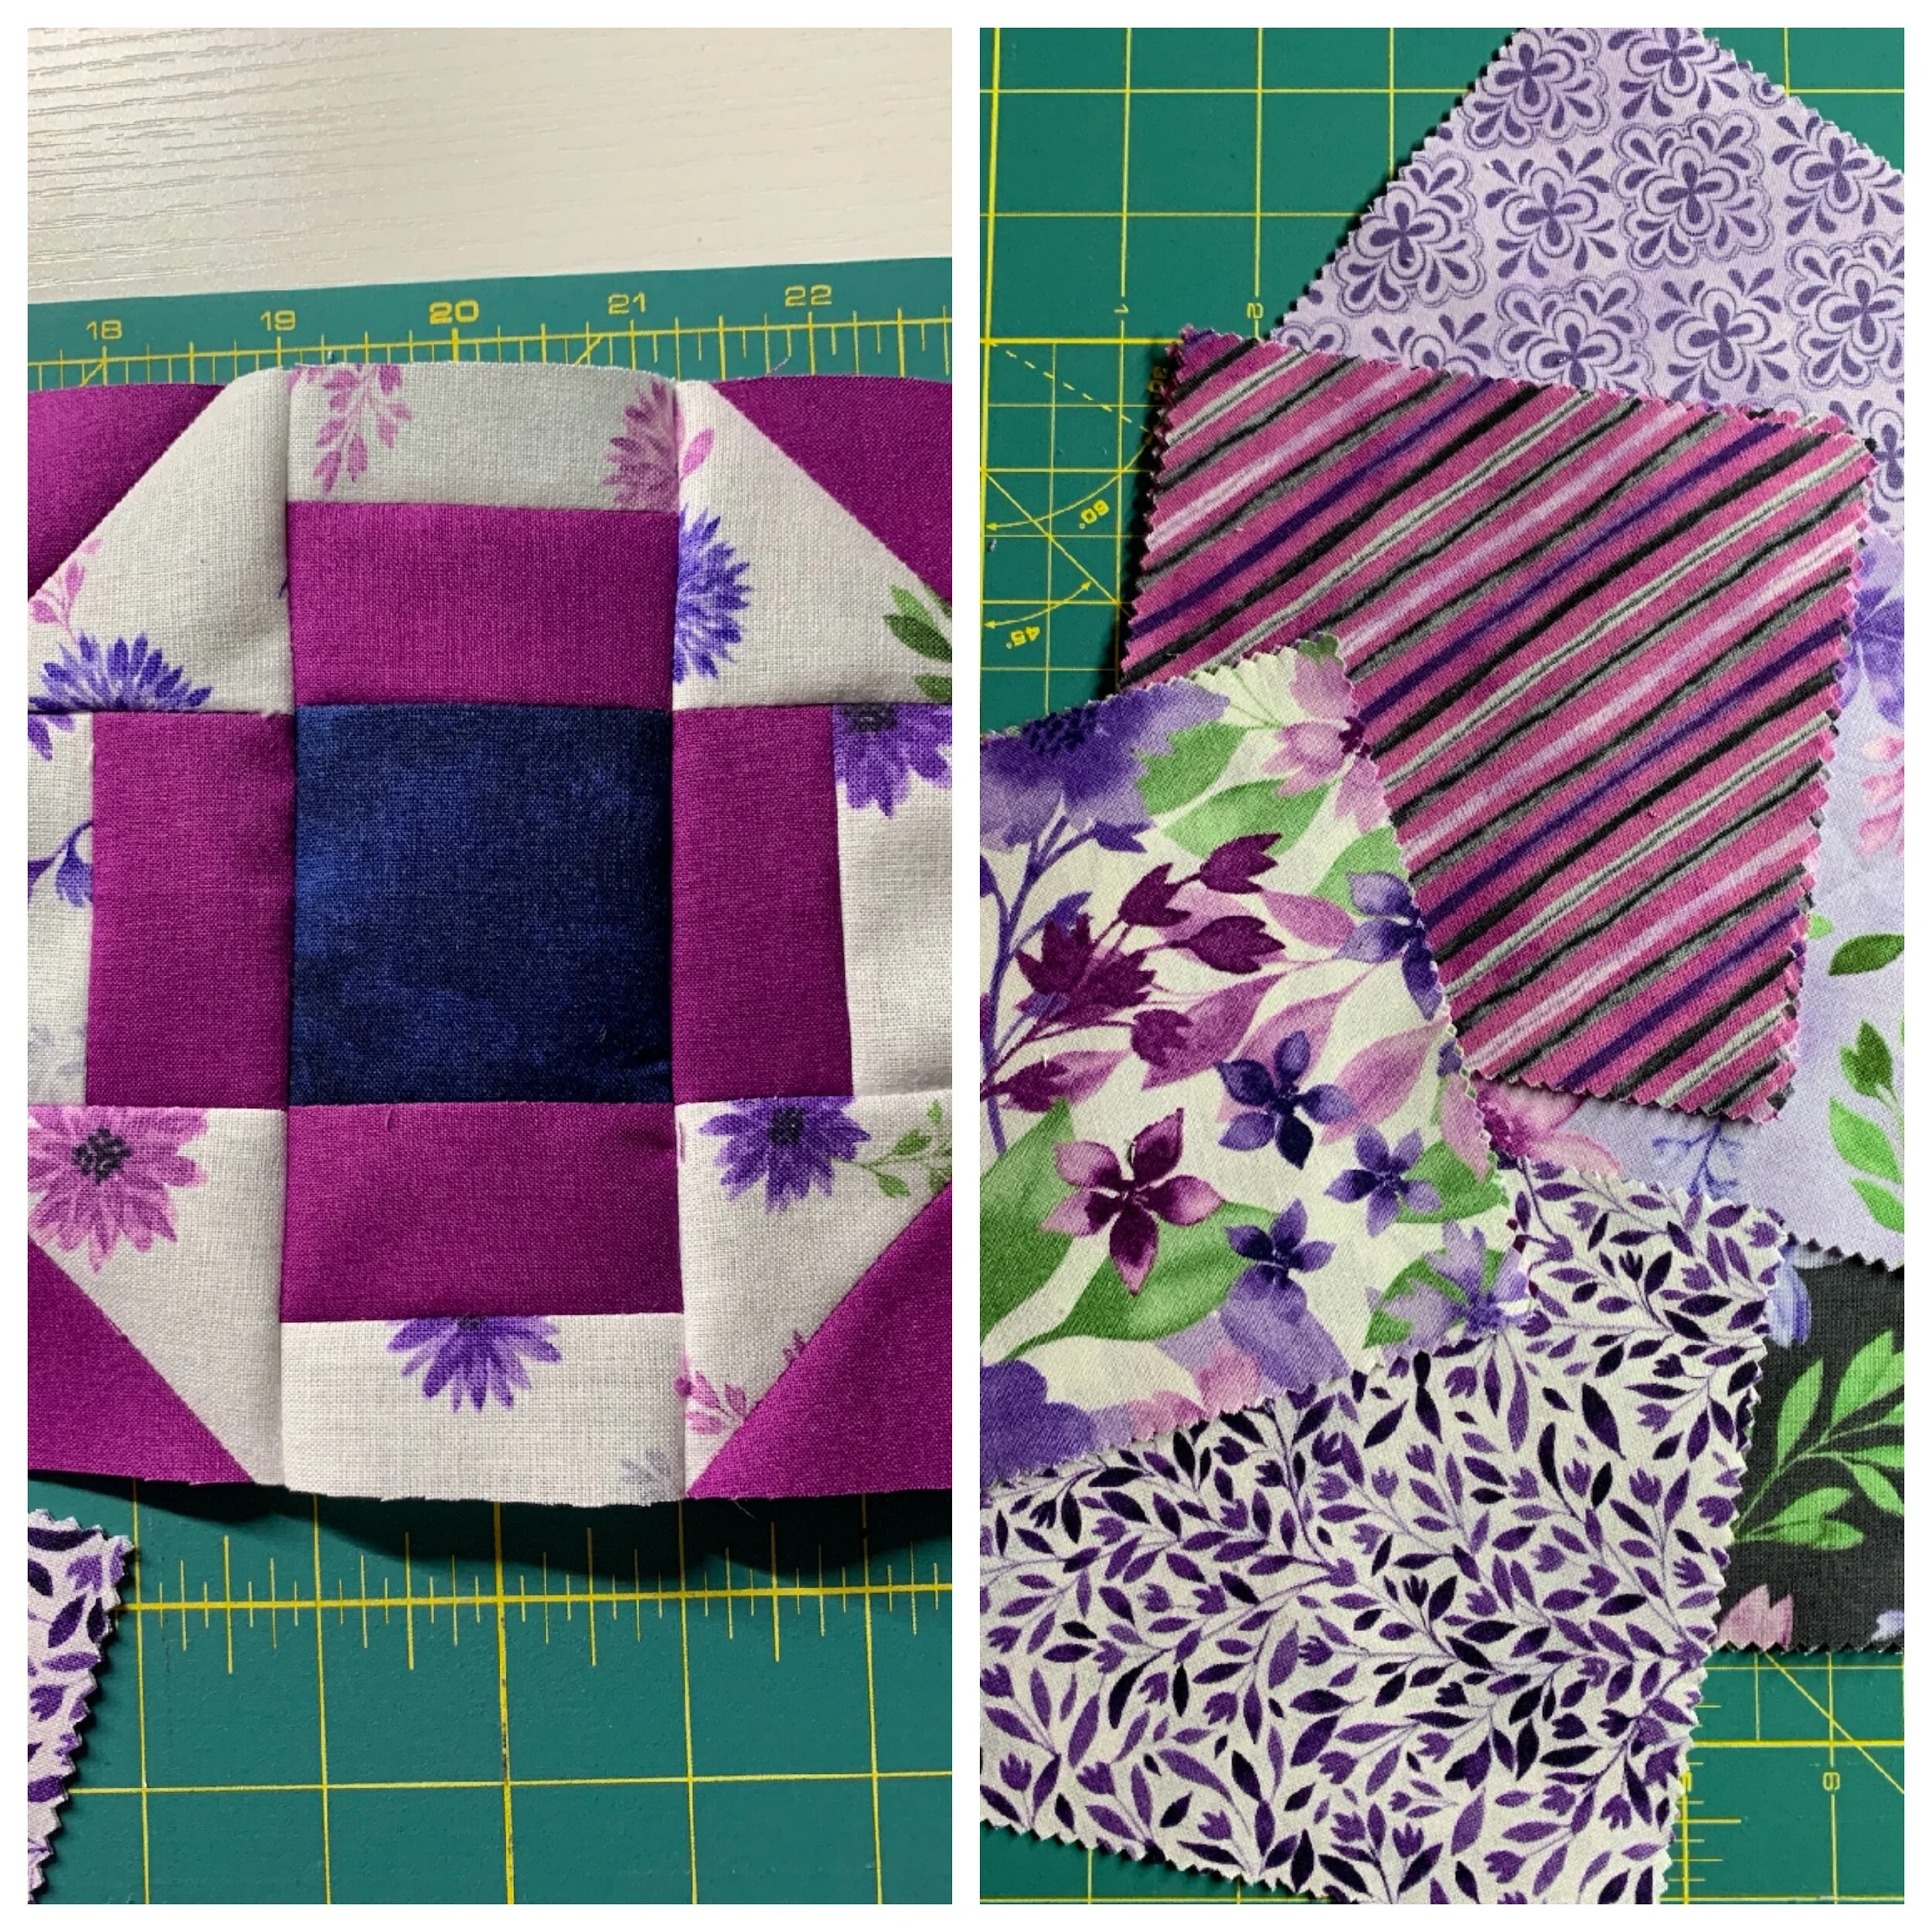
Fabric Selection Fail
My next project will be a table topper for our dining room table or for the secretary in our foyer. Mike’s been lobbying for the topper for a while now. I bought two charm packs (5” precut fabric) of “Amethyst Magic” (that’s the triangular lavender/amethyst fabric in the two pictures above). The yellow fabric you see at the top will be sashing (narrow bands of fabric that set off the block). I cut fabric for one block and created the half square triangles (the amethyst and brown) and laid the block out.
We thought the brown and mottled blue fabric would look great. The picture on the left shows the brown fabric and the right shows both the blue and the brown. I thought to myself “Ugg” and showed the blocks to Mike. He said “Ugh” too. Somehow it’s too muddy. I’ll be off to the fabric stores here in town looking for lavender fabric and maybe burgundy for the sashing. This is one example of how fabric stash grows 😁
What will 2020 look like?
A new year and a new decade. My goals for the new year are severalfold:
Continue honing my skill in the basics of quilting: cutting accurately; sewing a consistent 1/4” seam; getting better at binding the quilt.
Learn foundation paper piecing
Attempt more complicated blocks: circles, half-square triangles (HST)
Implement more quilting patterns on the quilt sandwich
I’ll continue making baby quilts for charitable giving.
I have a couple of items I want to do for the house: two table toppers (one each for the dining room table and for the secretary); two decorative pillows for the house and perhaps a present for a couple of relatives.
Let’s see what I can accomplish. . .

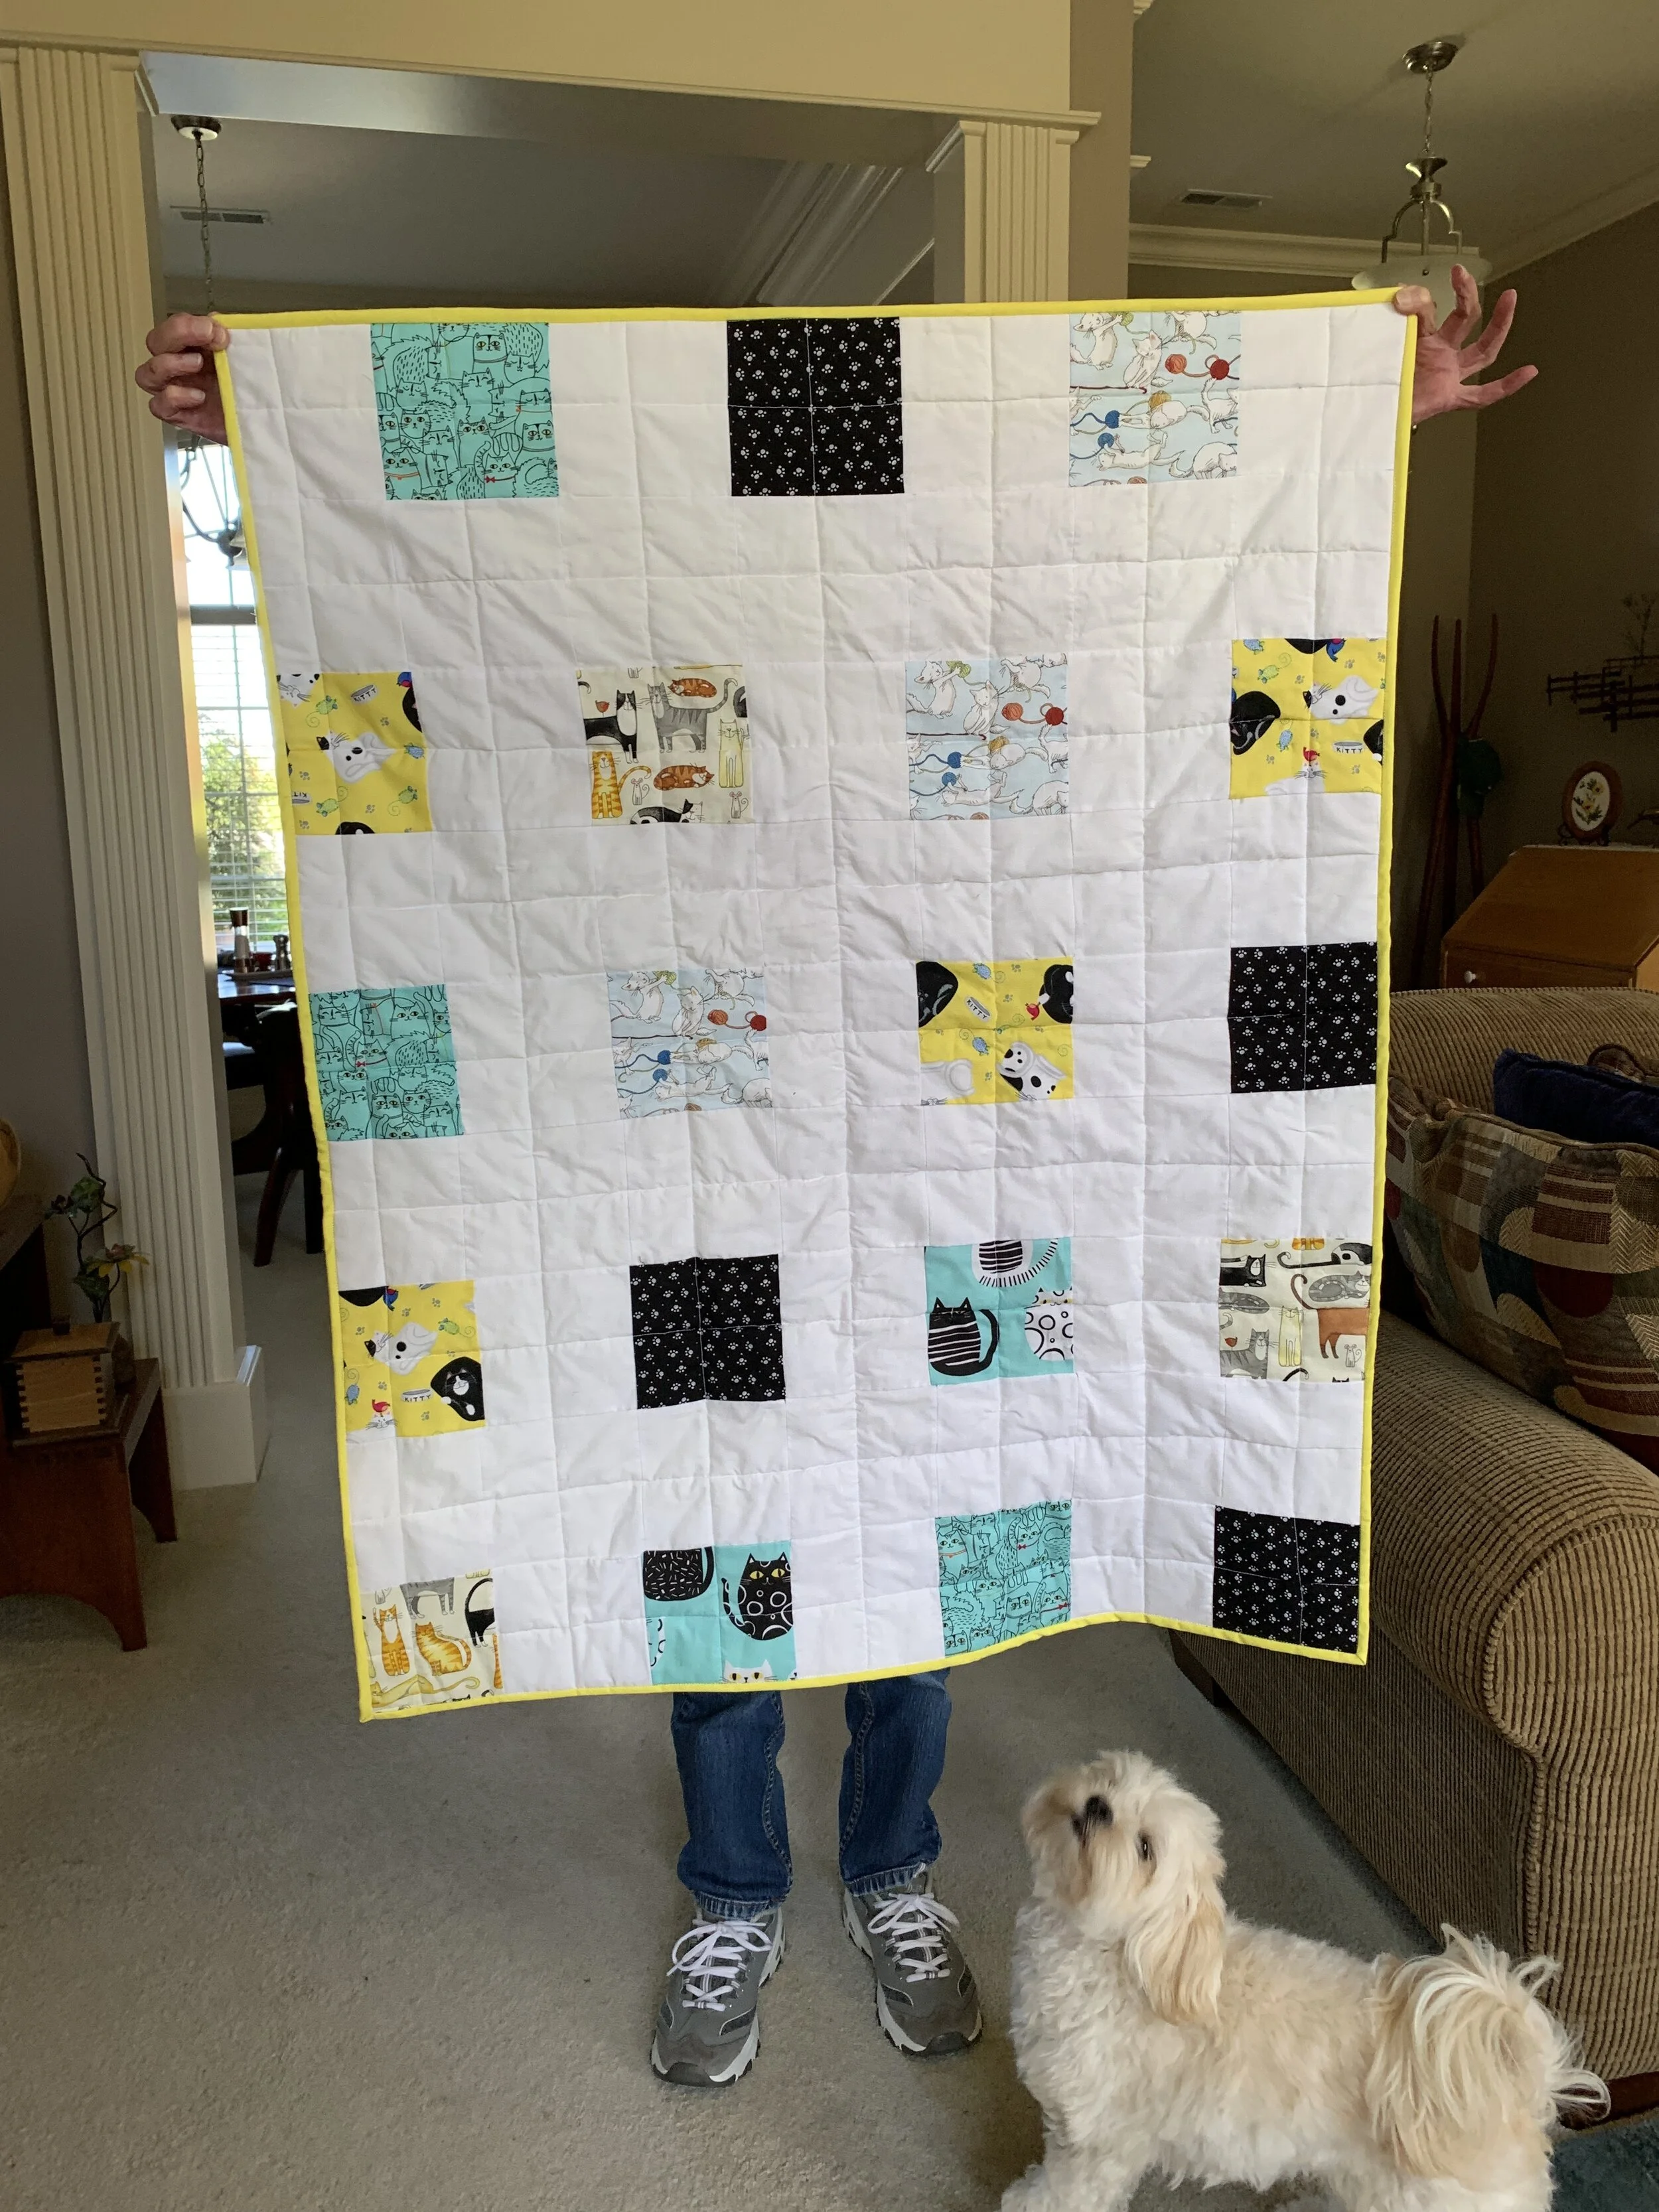
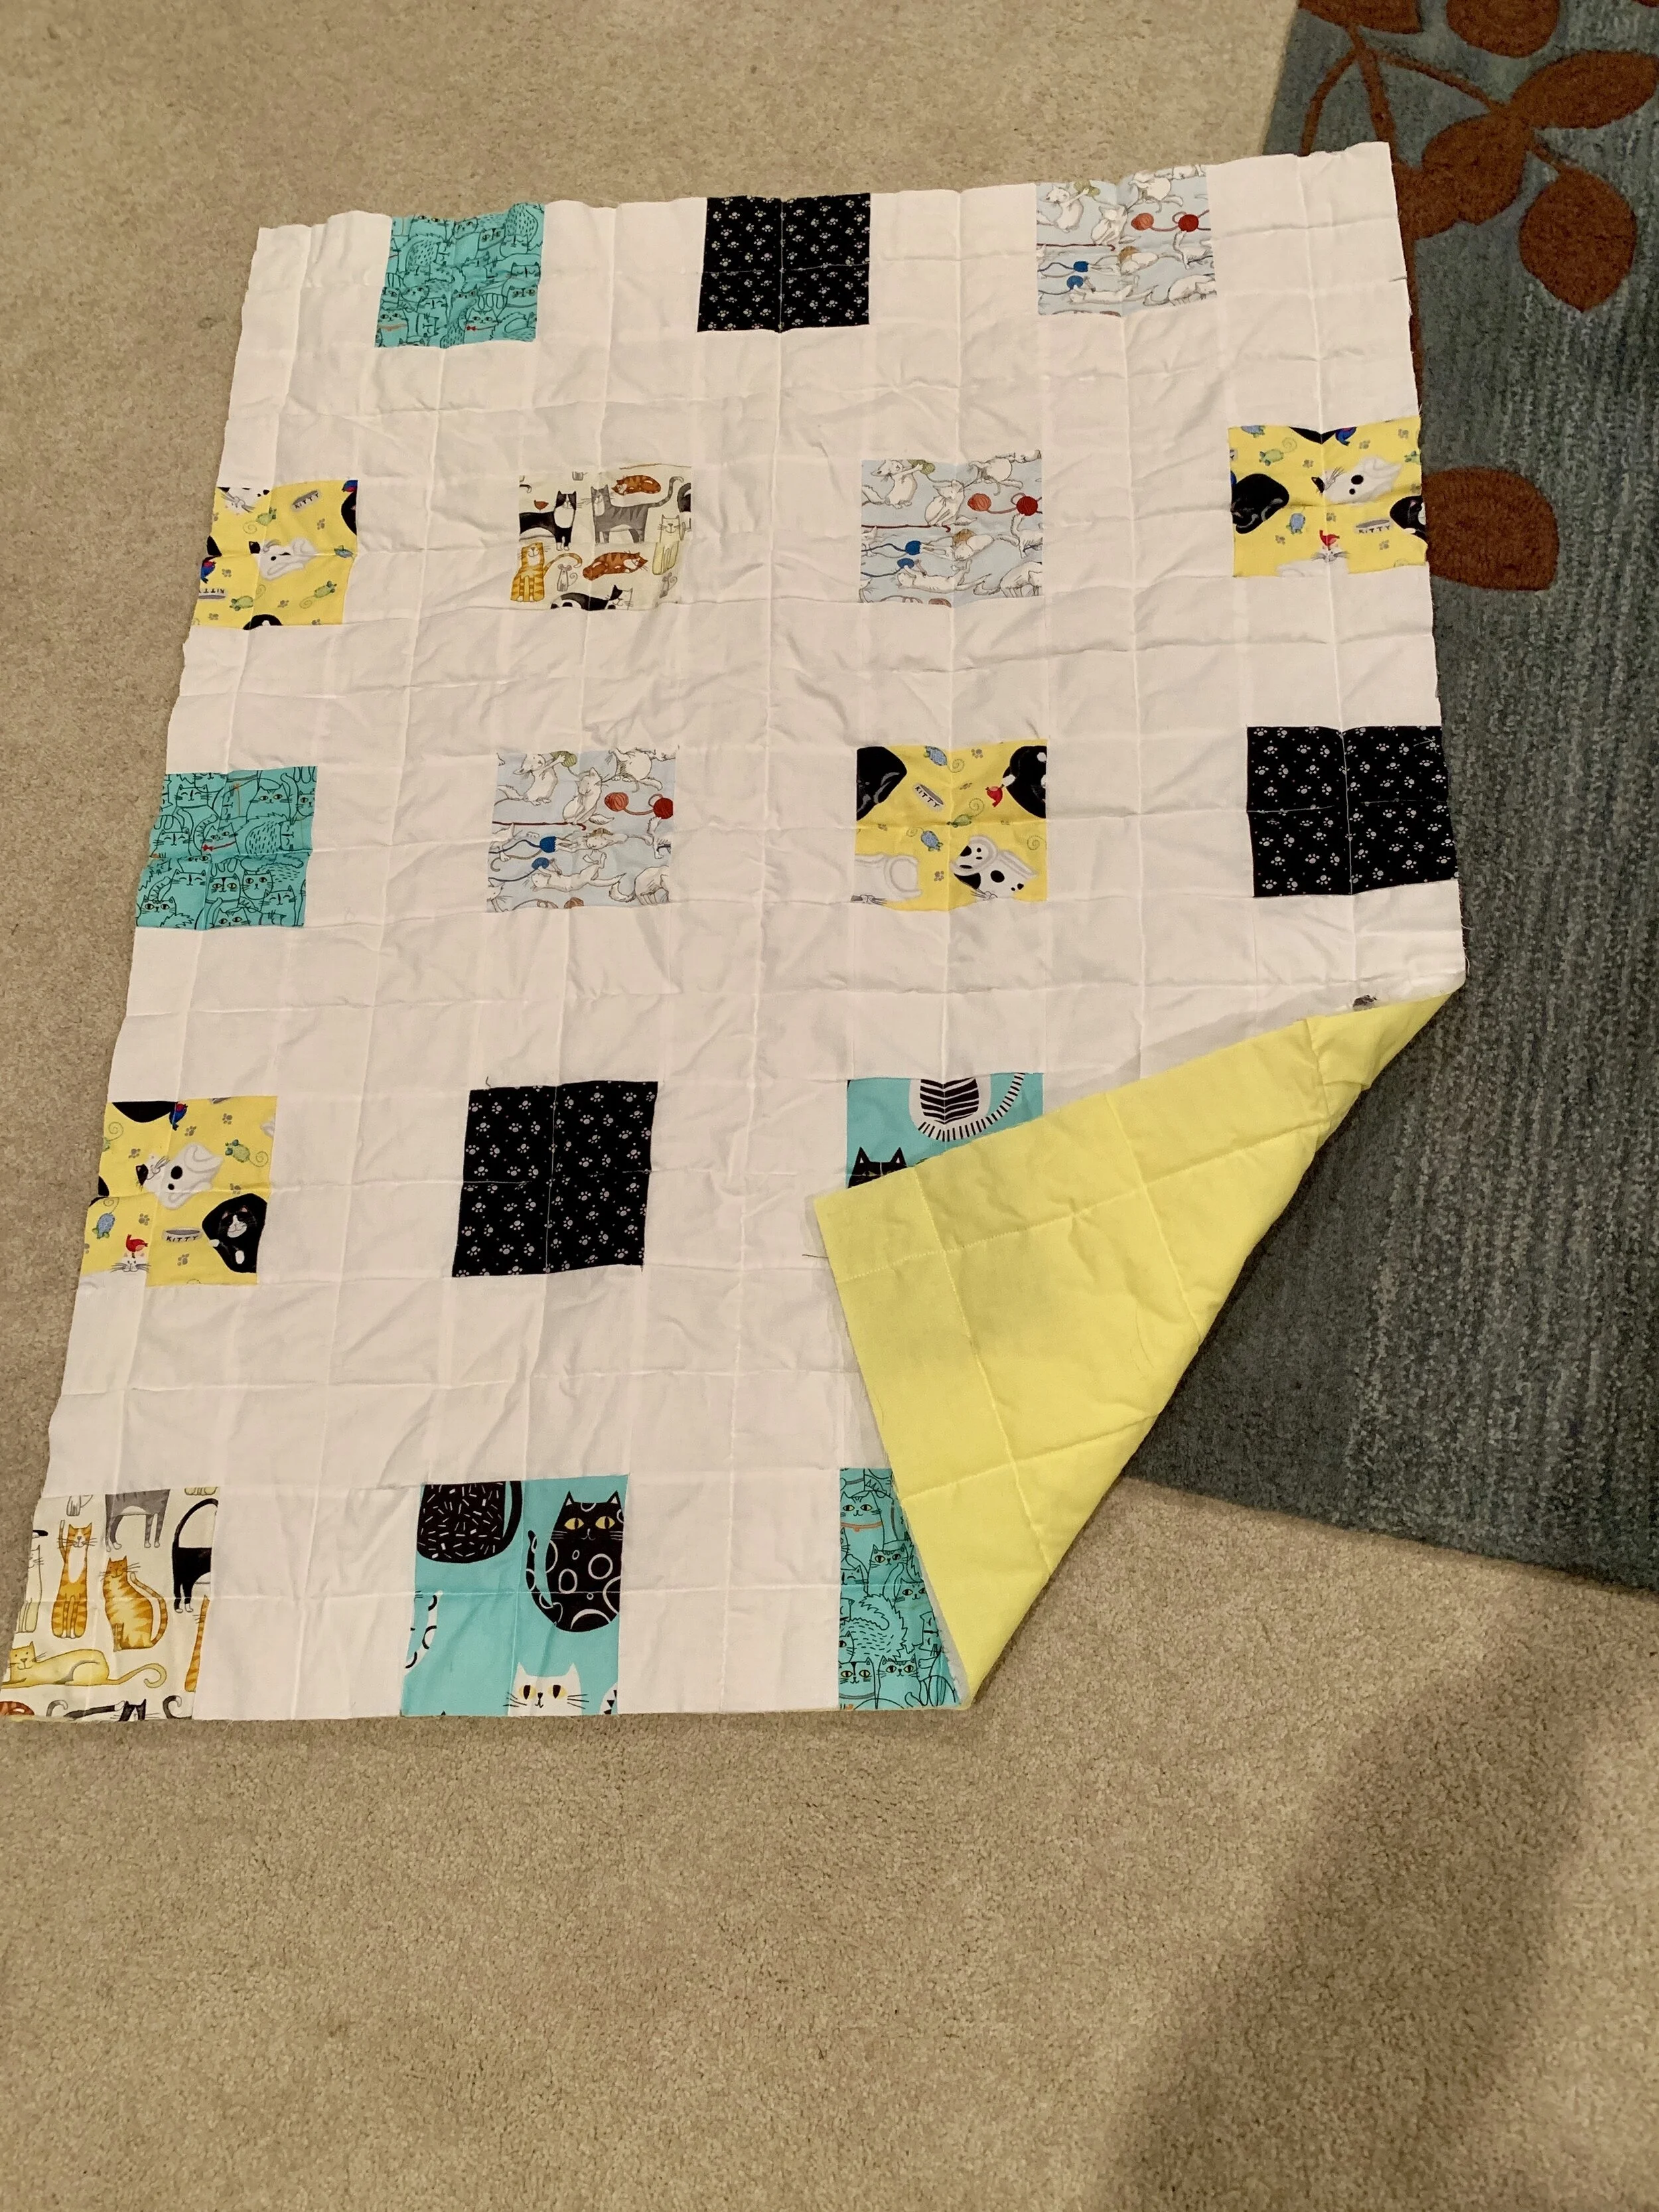
Cat Quilt 2 Complete !
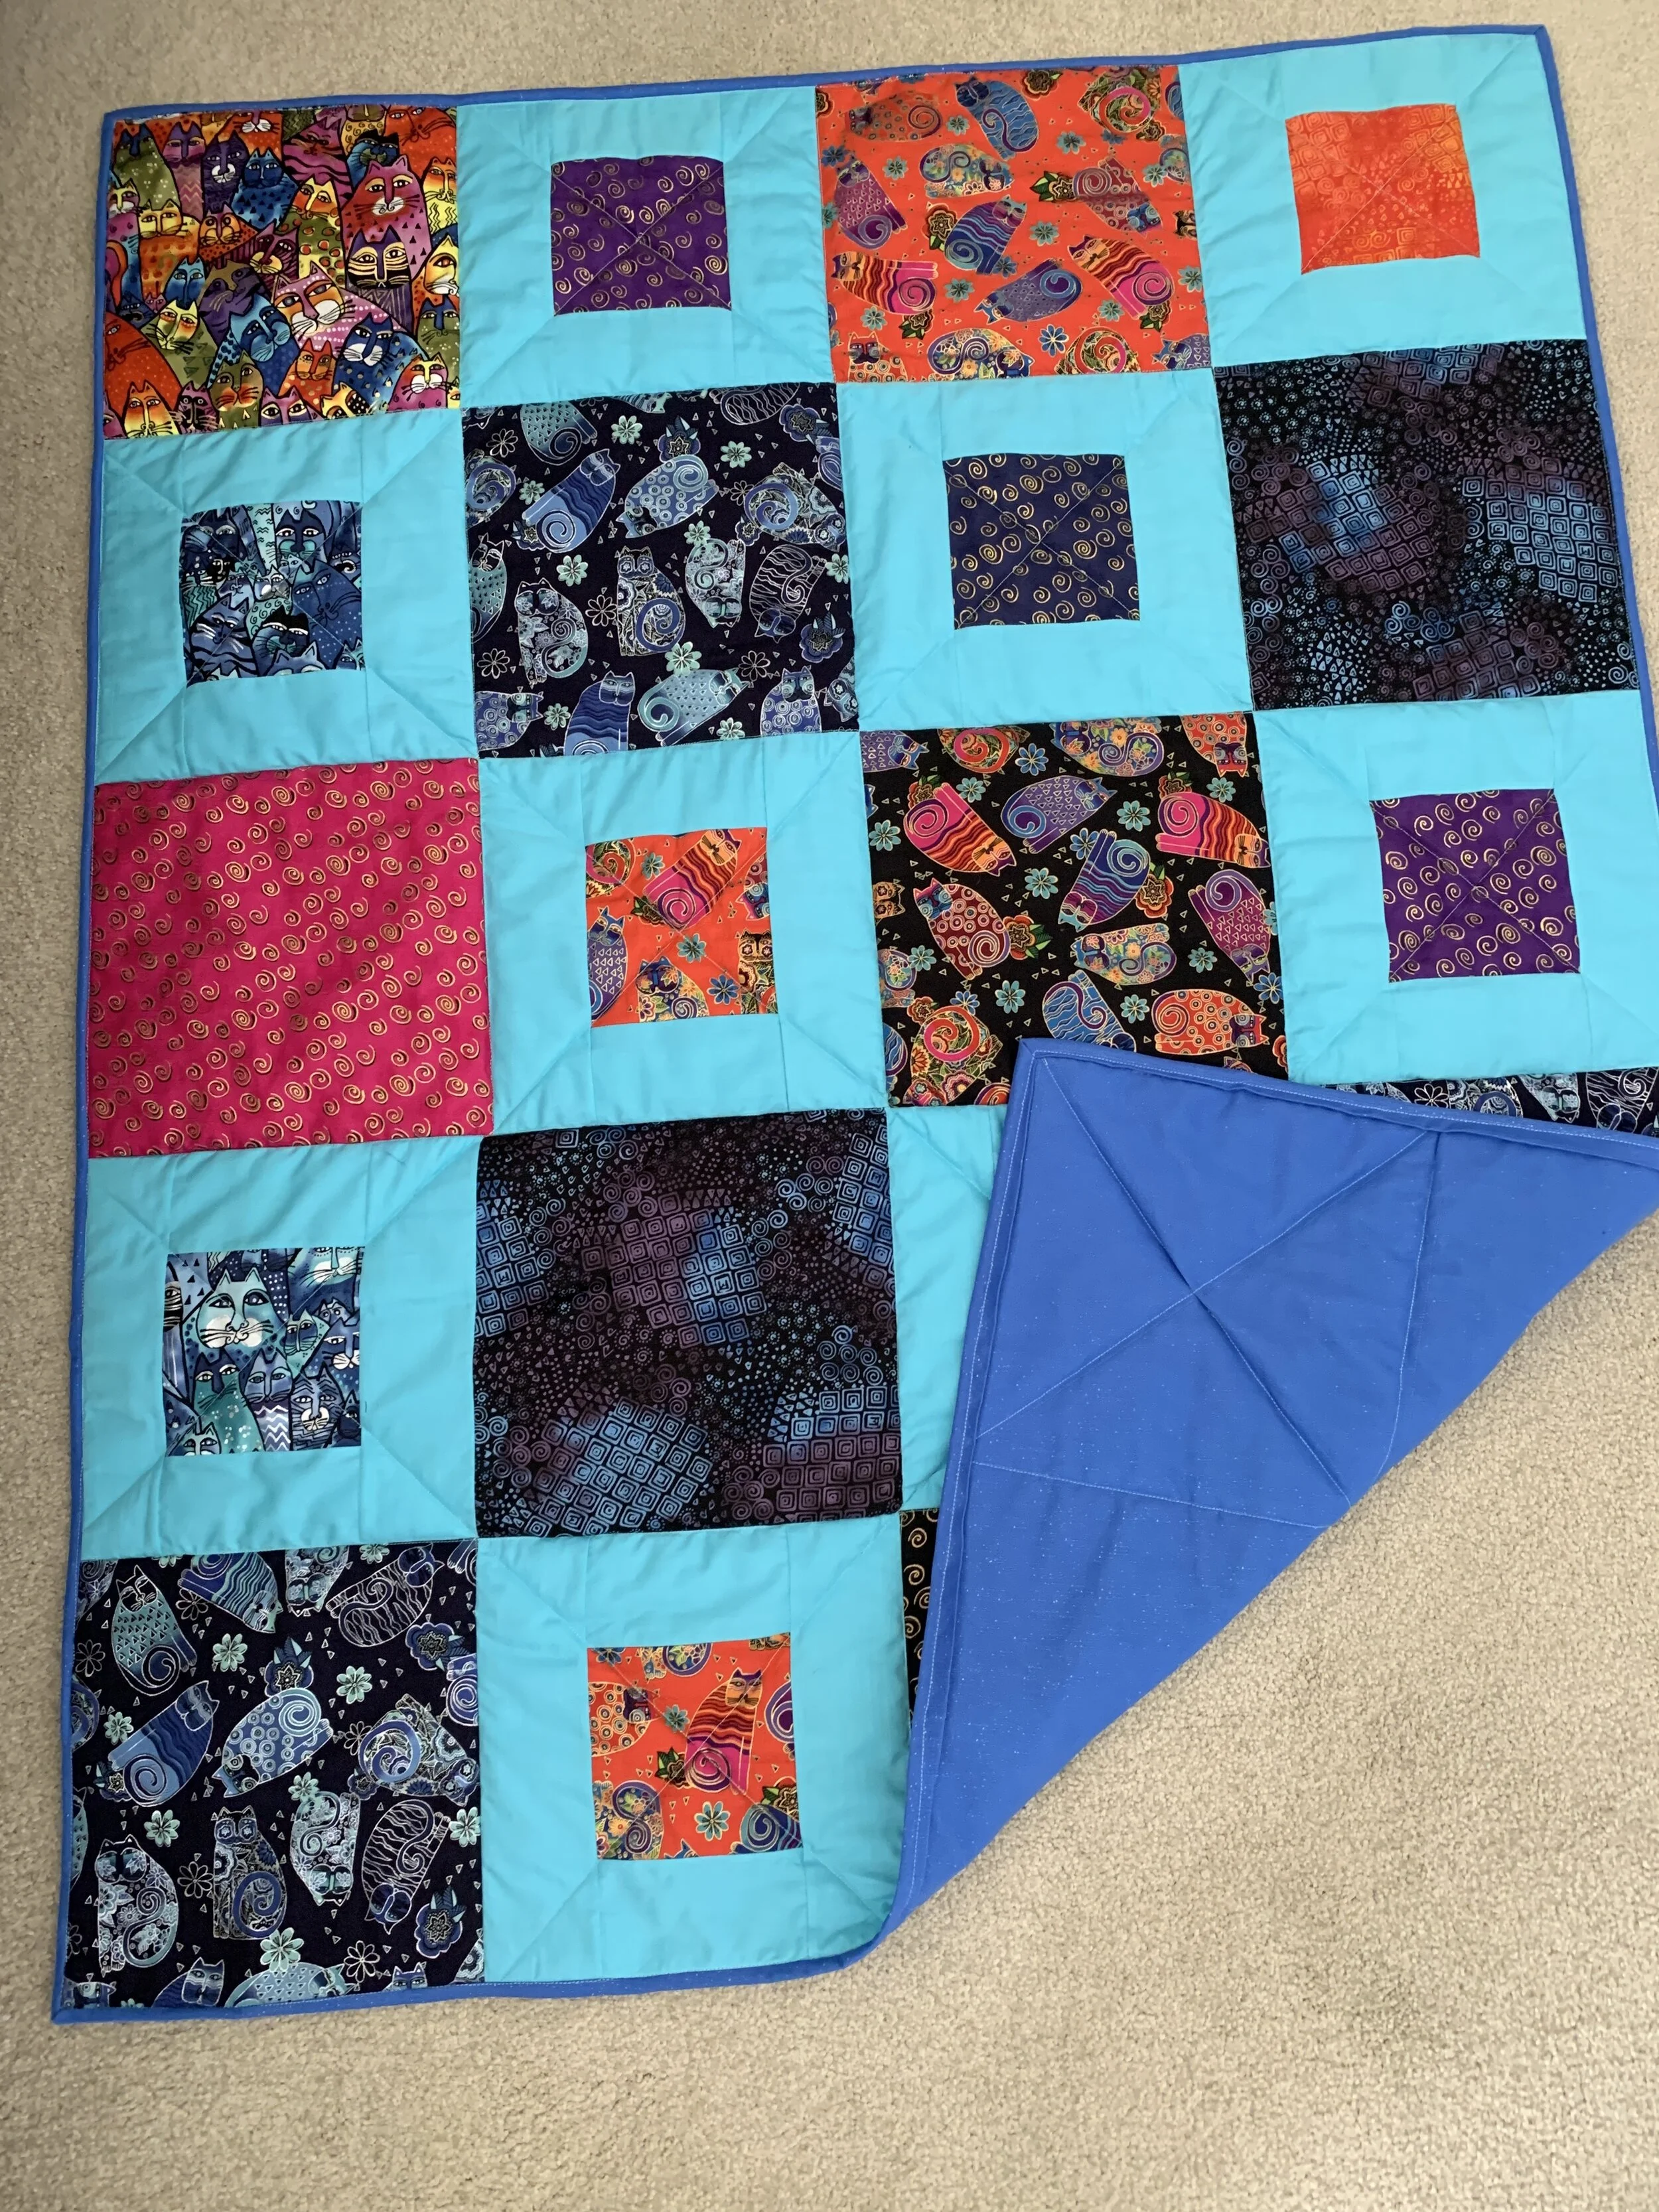
The second cat quilt is complete ! That’s Calliope (better known as “Callie”) our llasapoo posing for the camera. This quilt is demonstrably better than the earlier quilt so I’m making progress in my quilting skills. I don’t aspire to entering a quilt show but I’d like to continue honing skills like cutting more perfectly, sewing “in the ditch” (stitching in the valley of an existing stitch — mostly done when applying the binding) without any bobbles and so on. . .

Quilting Humor
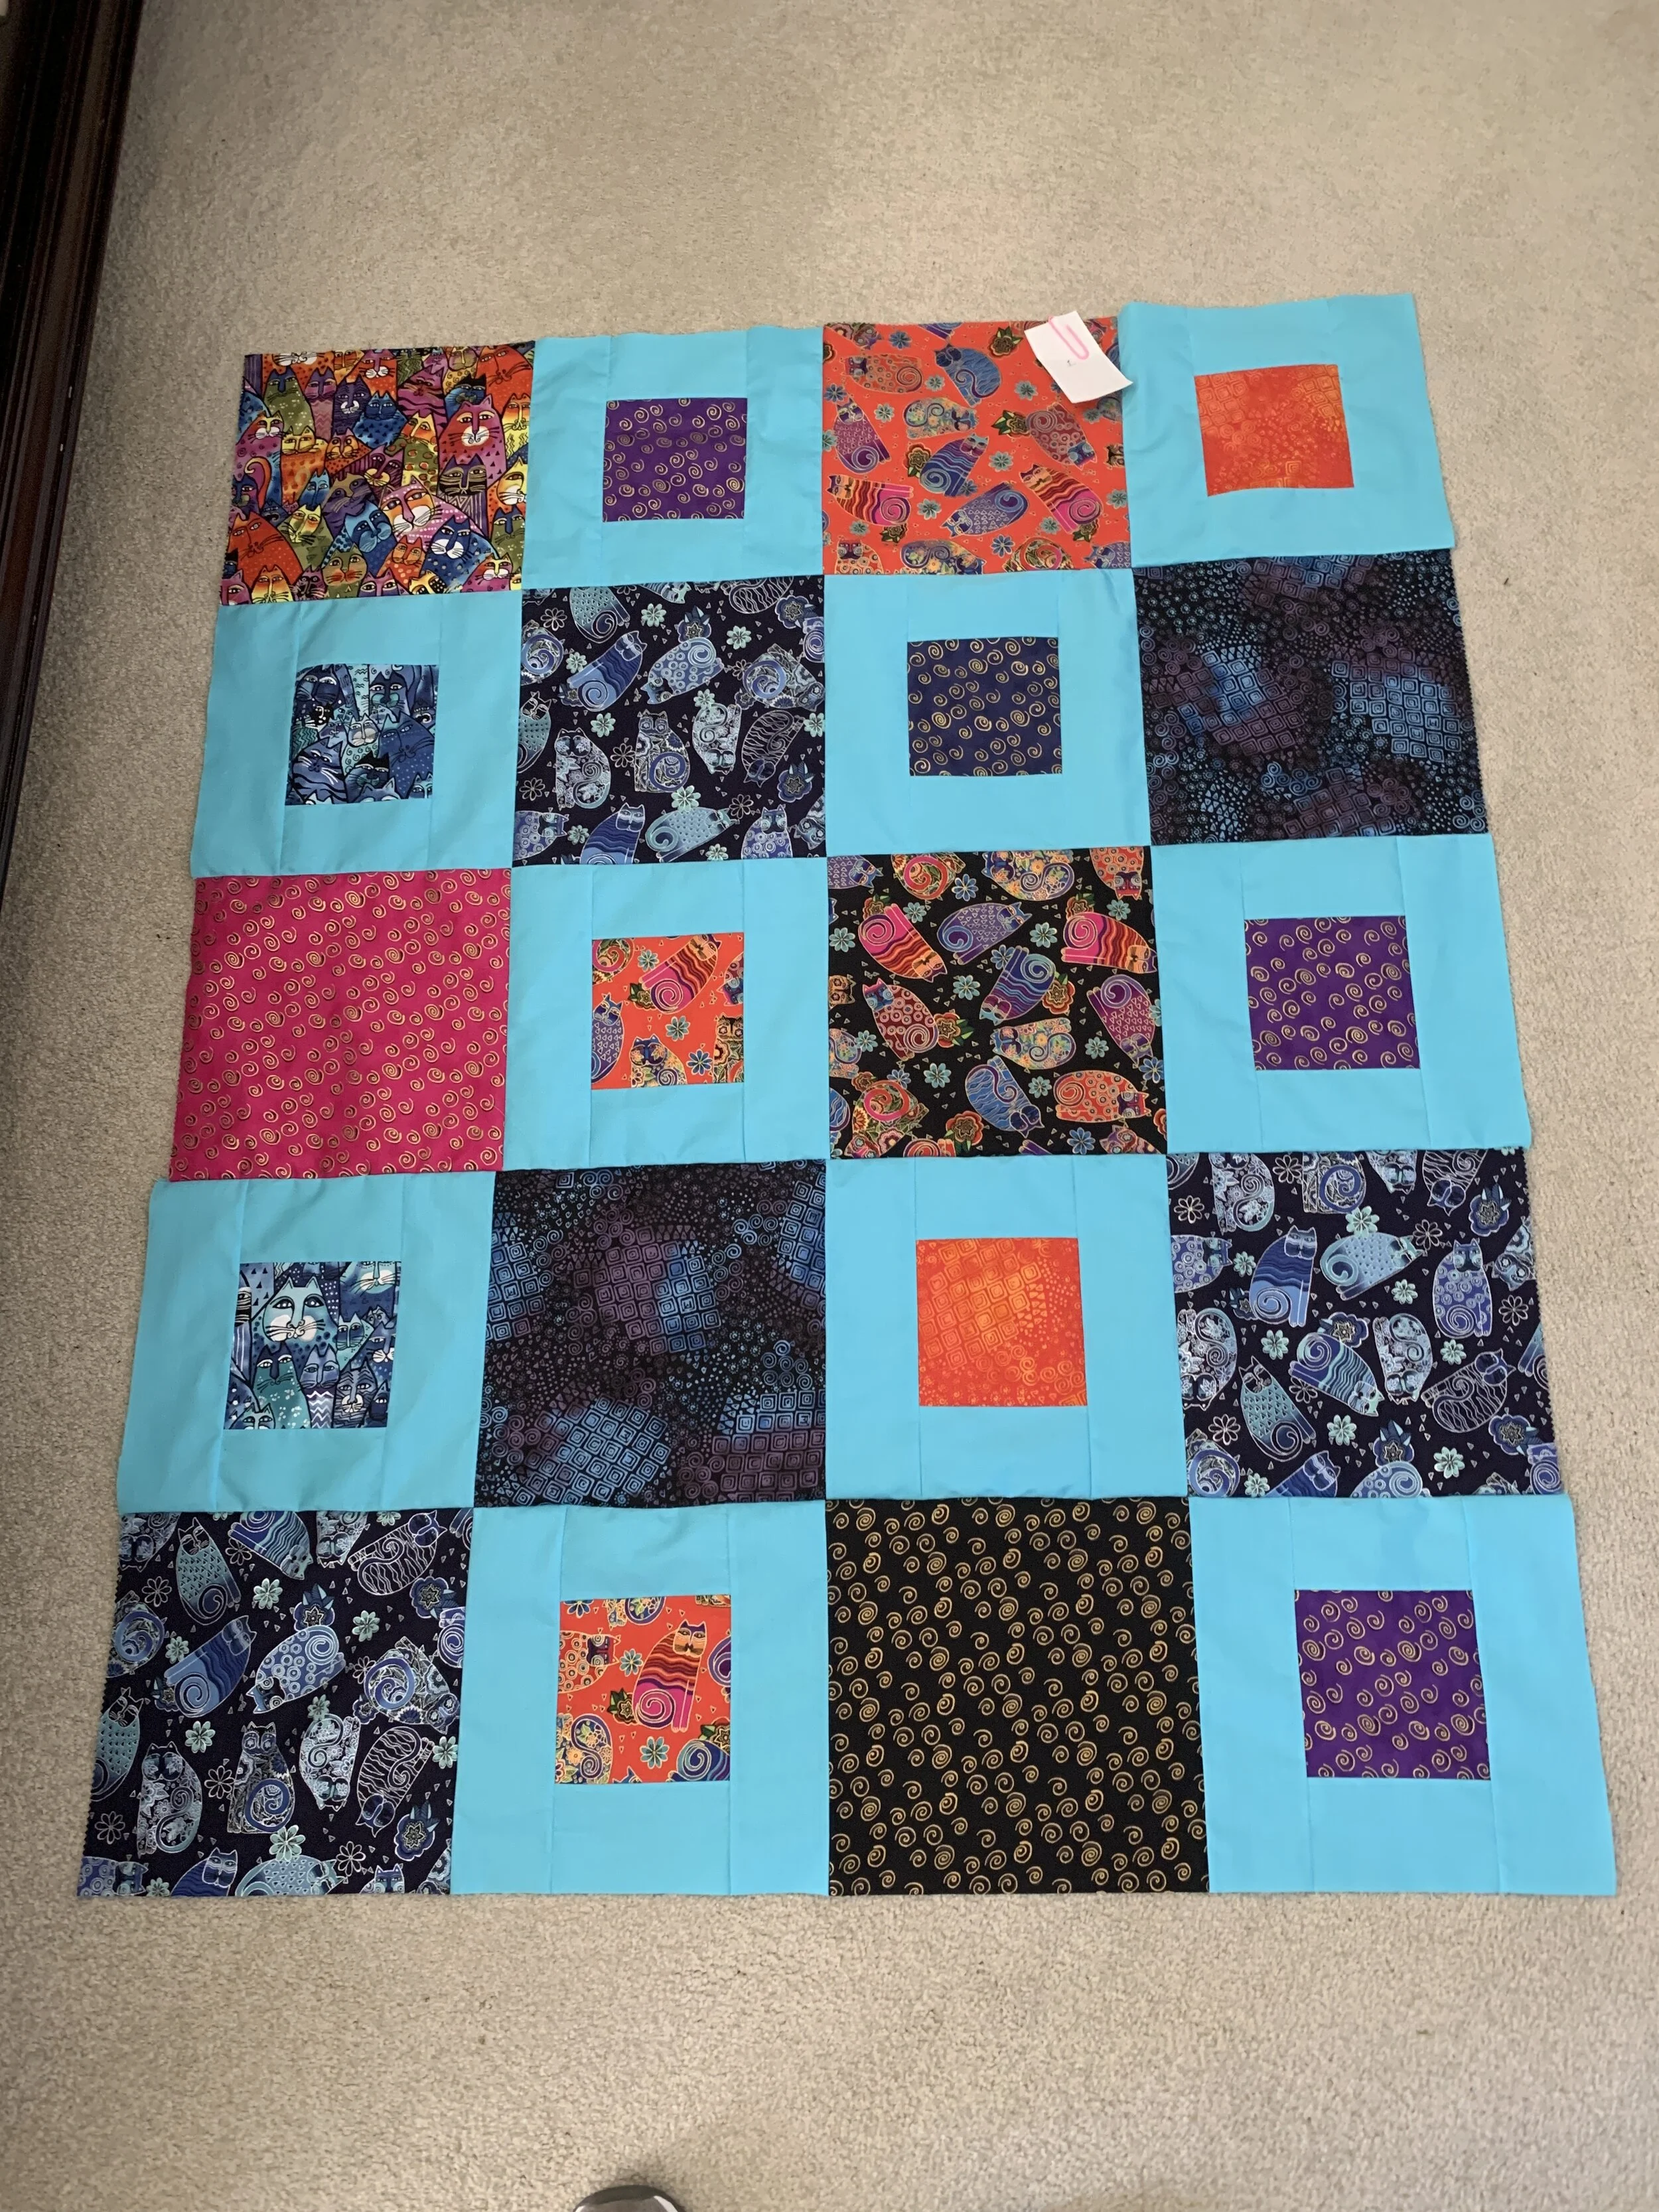
Cat Quilt Top Complete
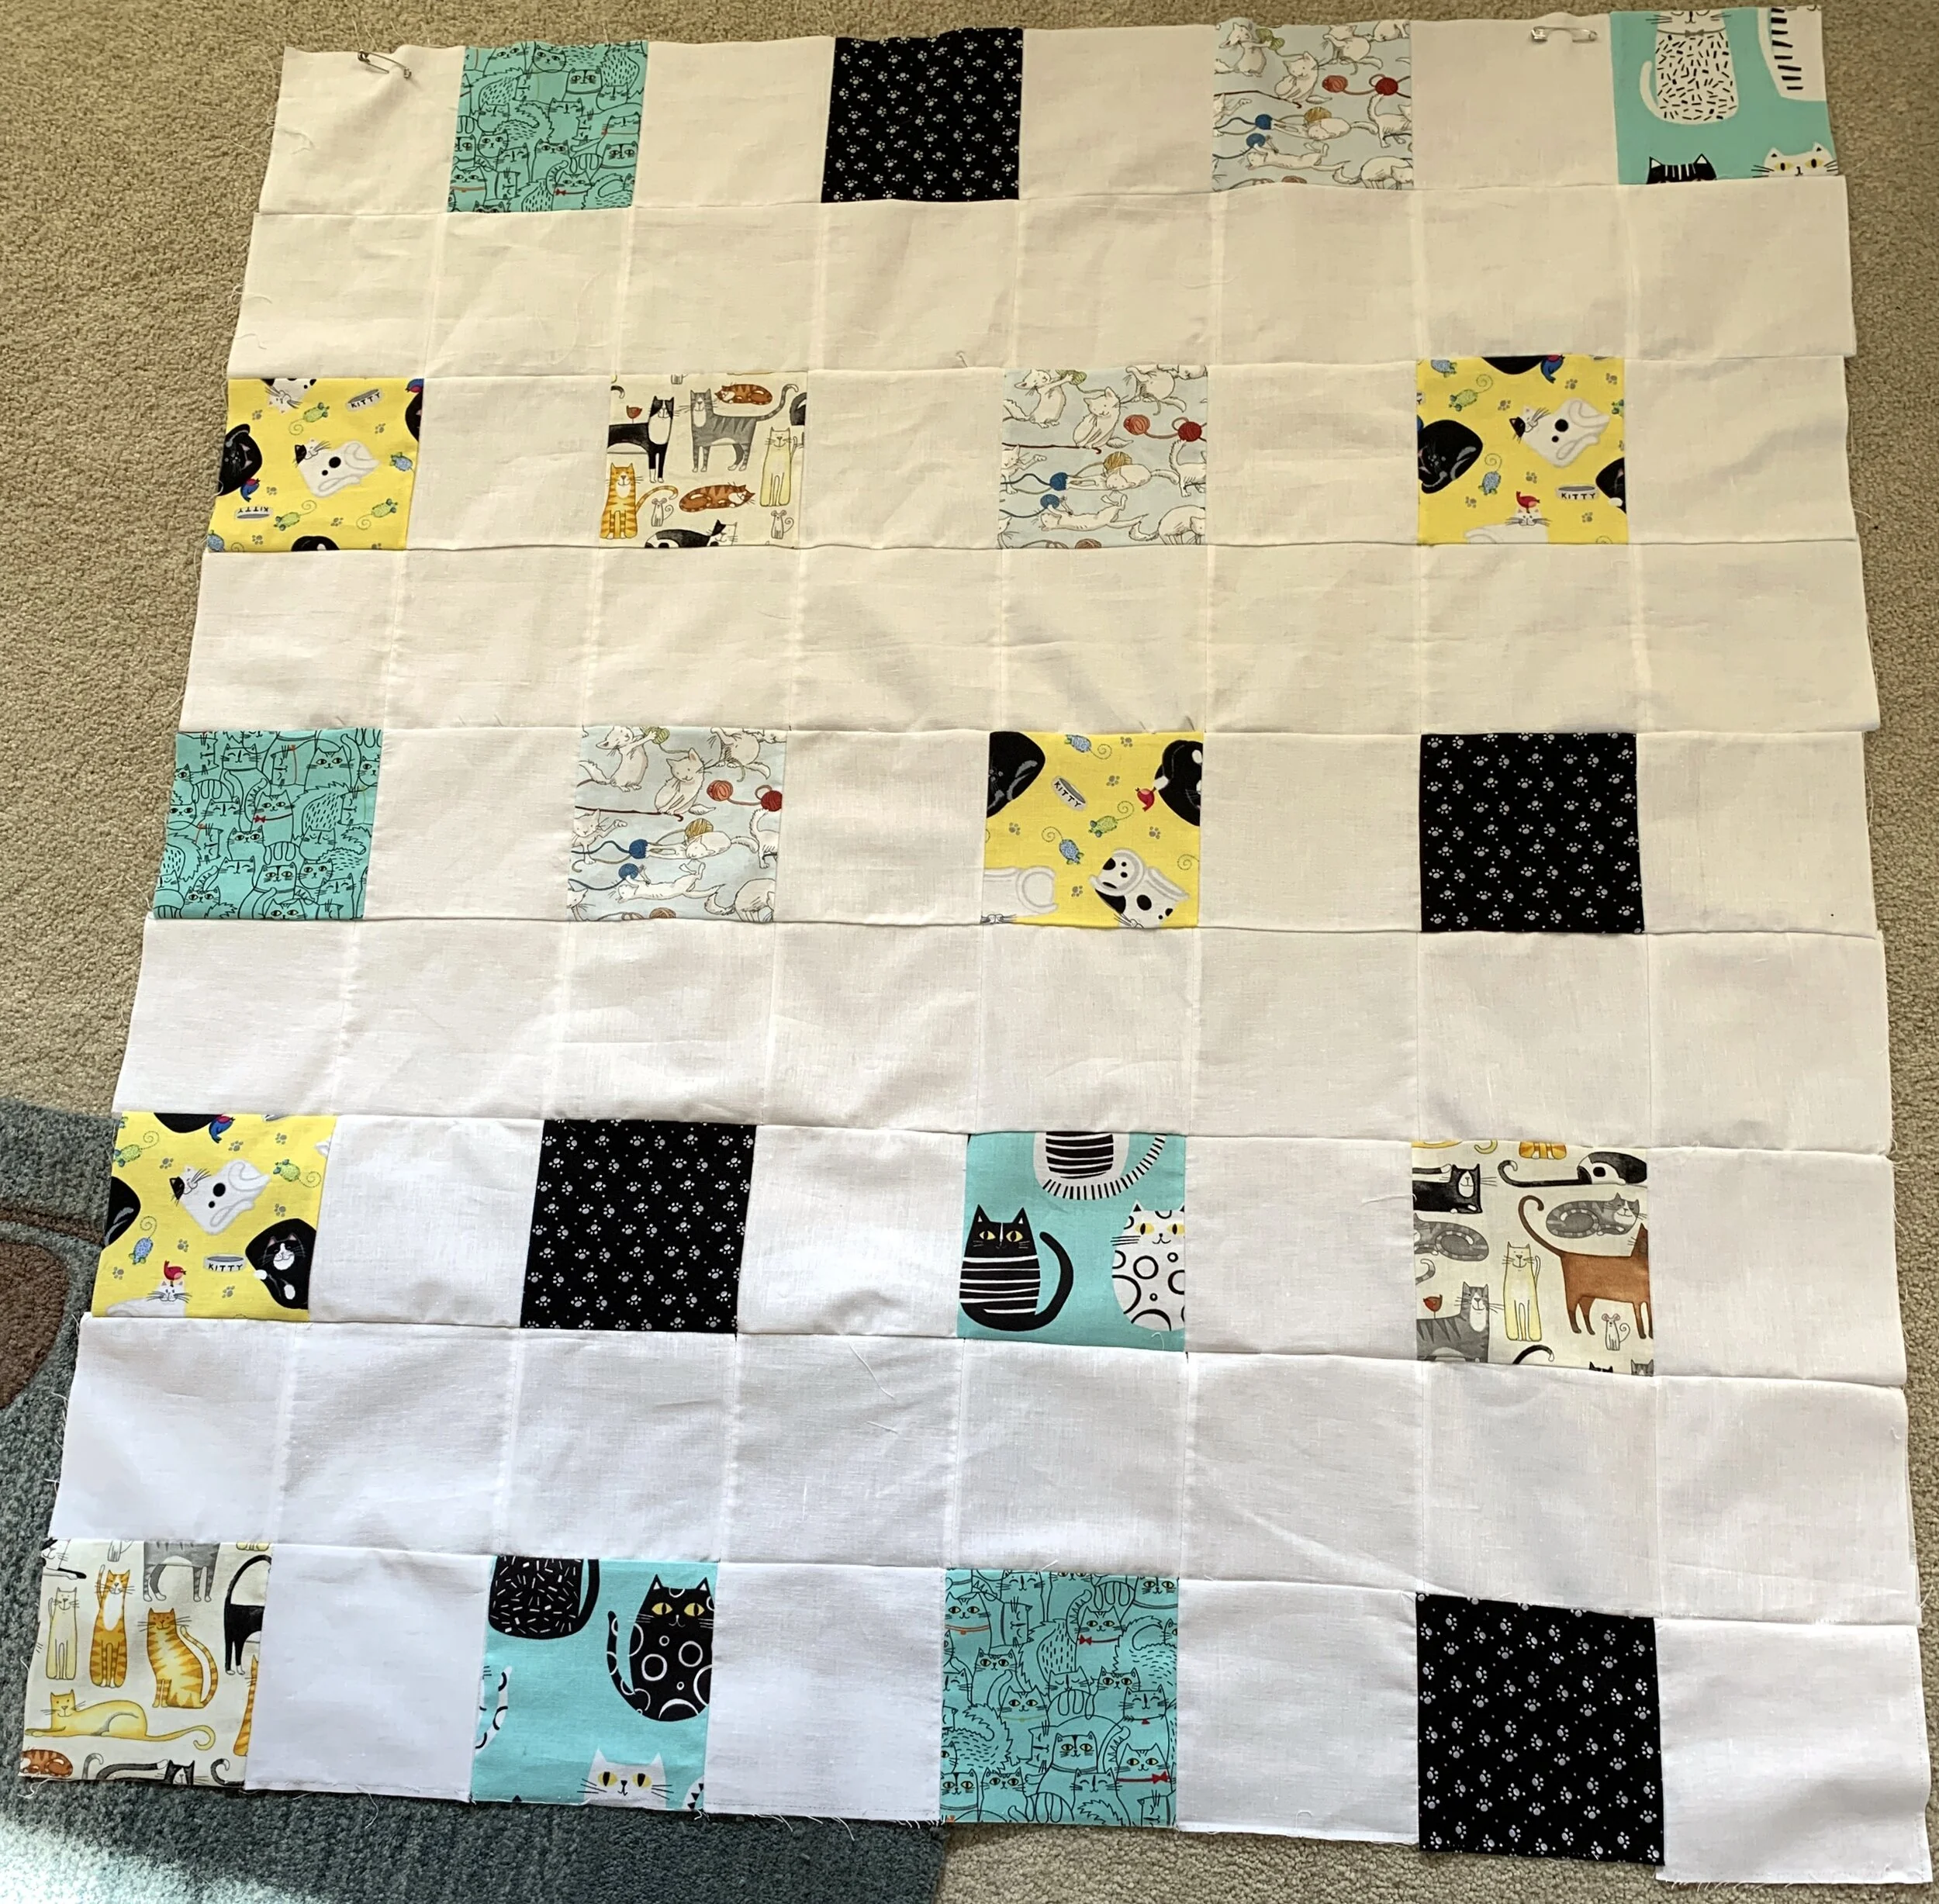
The quilt top is complete ! And I’ve made significant strides in my sewing and piecing because most of the corners match 😁 I have a little bobble here and there, but I think the quilting process will mask most of those. I’m real pleased with the colors in this quilt. My sister saw the fabric picture and asked how the baby would sleep since the fabric was soooo “loud”. I laughed and said I considered the fabric bold and vibrant and someone with the same taste would like it too. I think the turquoise helped cool it down, though. And wait’ll you see the backing I’ve chosen 😉
Now I’m off to create the quilt sandwich (top, batting, back) and do some study about what quilting I want do on this.

This is the fabric I’ll be using for my next project. It’ll be another simple baby quilt. The fabric is “Feline Frolic” from ClothWorks . I bought the “layer cake” (10 inch pre-cut fabric) from Missouri Star Quilt Co in one of their Daily Deal sales. I love the colors and patterns on the fabric and look forward to getting going on this quilt (after I do some routine maintenance on my sewing machine — change needle, blow out fluff that accumulates from thread and batting).
My Next Project - Cat Quilt 2

Amazing Quilt (not by me)
The fabric is a panel titled Dream Big Horizon by Hoffman Fabrics. The panel itself is very beautiful but the FMQ (Free Motion Quilting) is absolutely gorgeous. Notice how smooth the feathers are — no bobbles or jagged edges. Also the quilter used a darker thread color around the outer edges of the quilt. I would guess this was done on a free-arm machine. This is a seriously gifted quilter. Click here to read comments from other quilters..

I found some lovely ombre fabric (ombre fabric fades from light to dark over a length of the fabric) that fades from a dark blue all the way though to a light lavender. I wanted to work with a wool and cotton batting since I’ve only worked with polyester. Some quilters insist that cotton/wool must be washed before using; others insist that it doesn’t need to be washed. I decided to wash one and not the other. I couldn’t tell the difference between them. Both create fluff like crazy — much more than the polyester. BUT the cotton/wool is much nicer in the hand.
I also wanted to see how the specialty stitches looked on a larger project. I liked the look quite a bit and will the using specialty stitching on other projects.
Another Placemat Finish
"Practice Makes Progress"
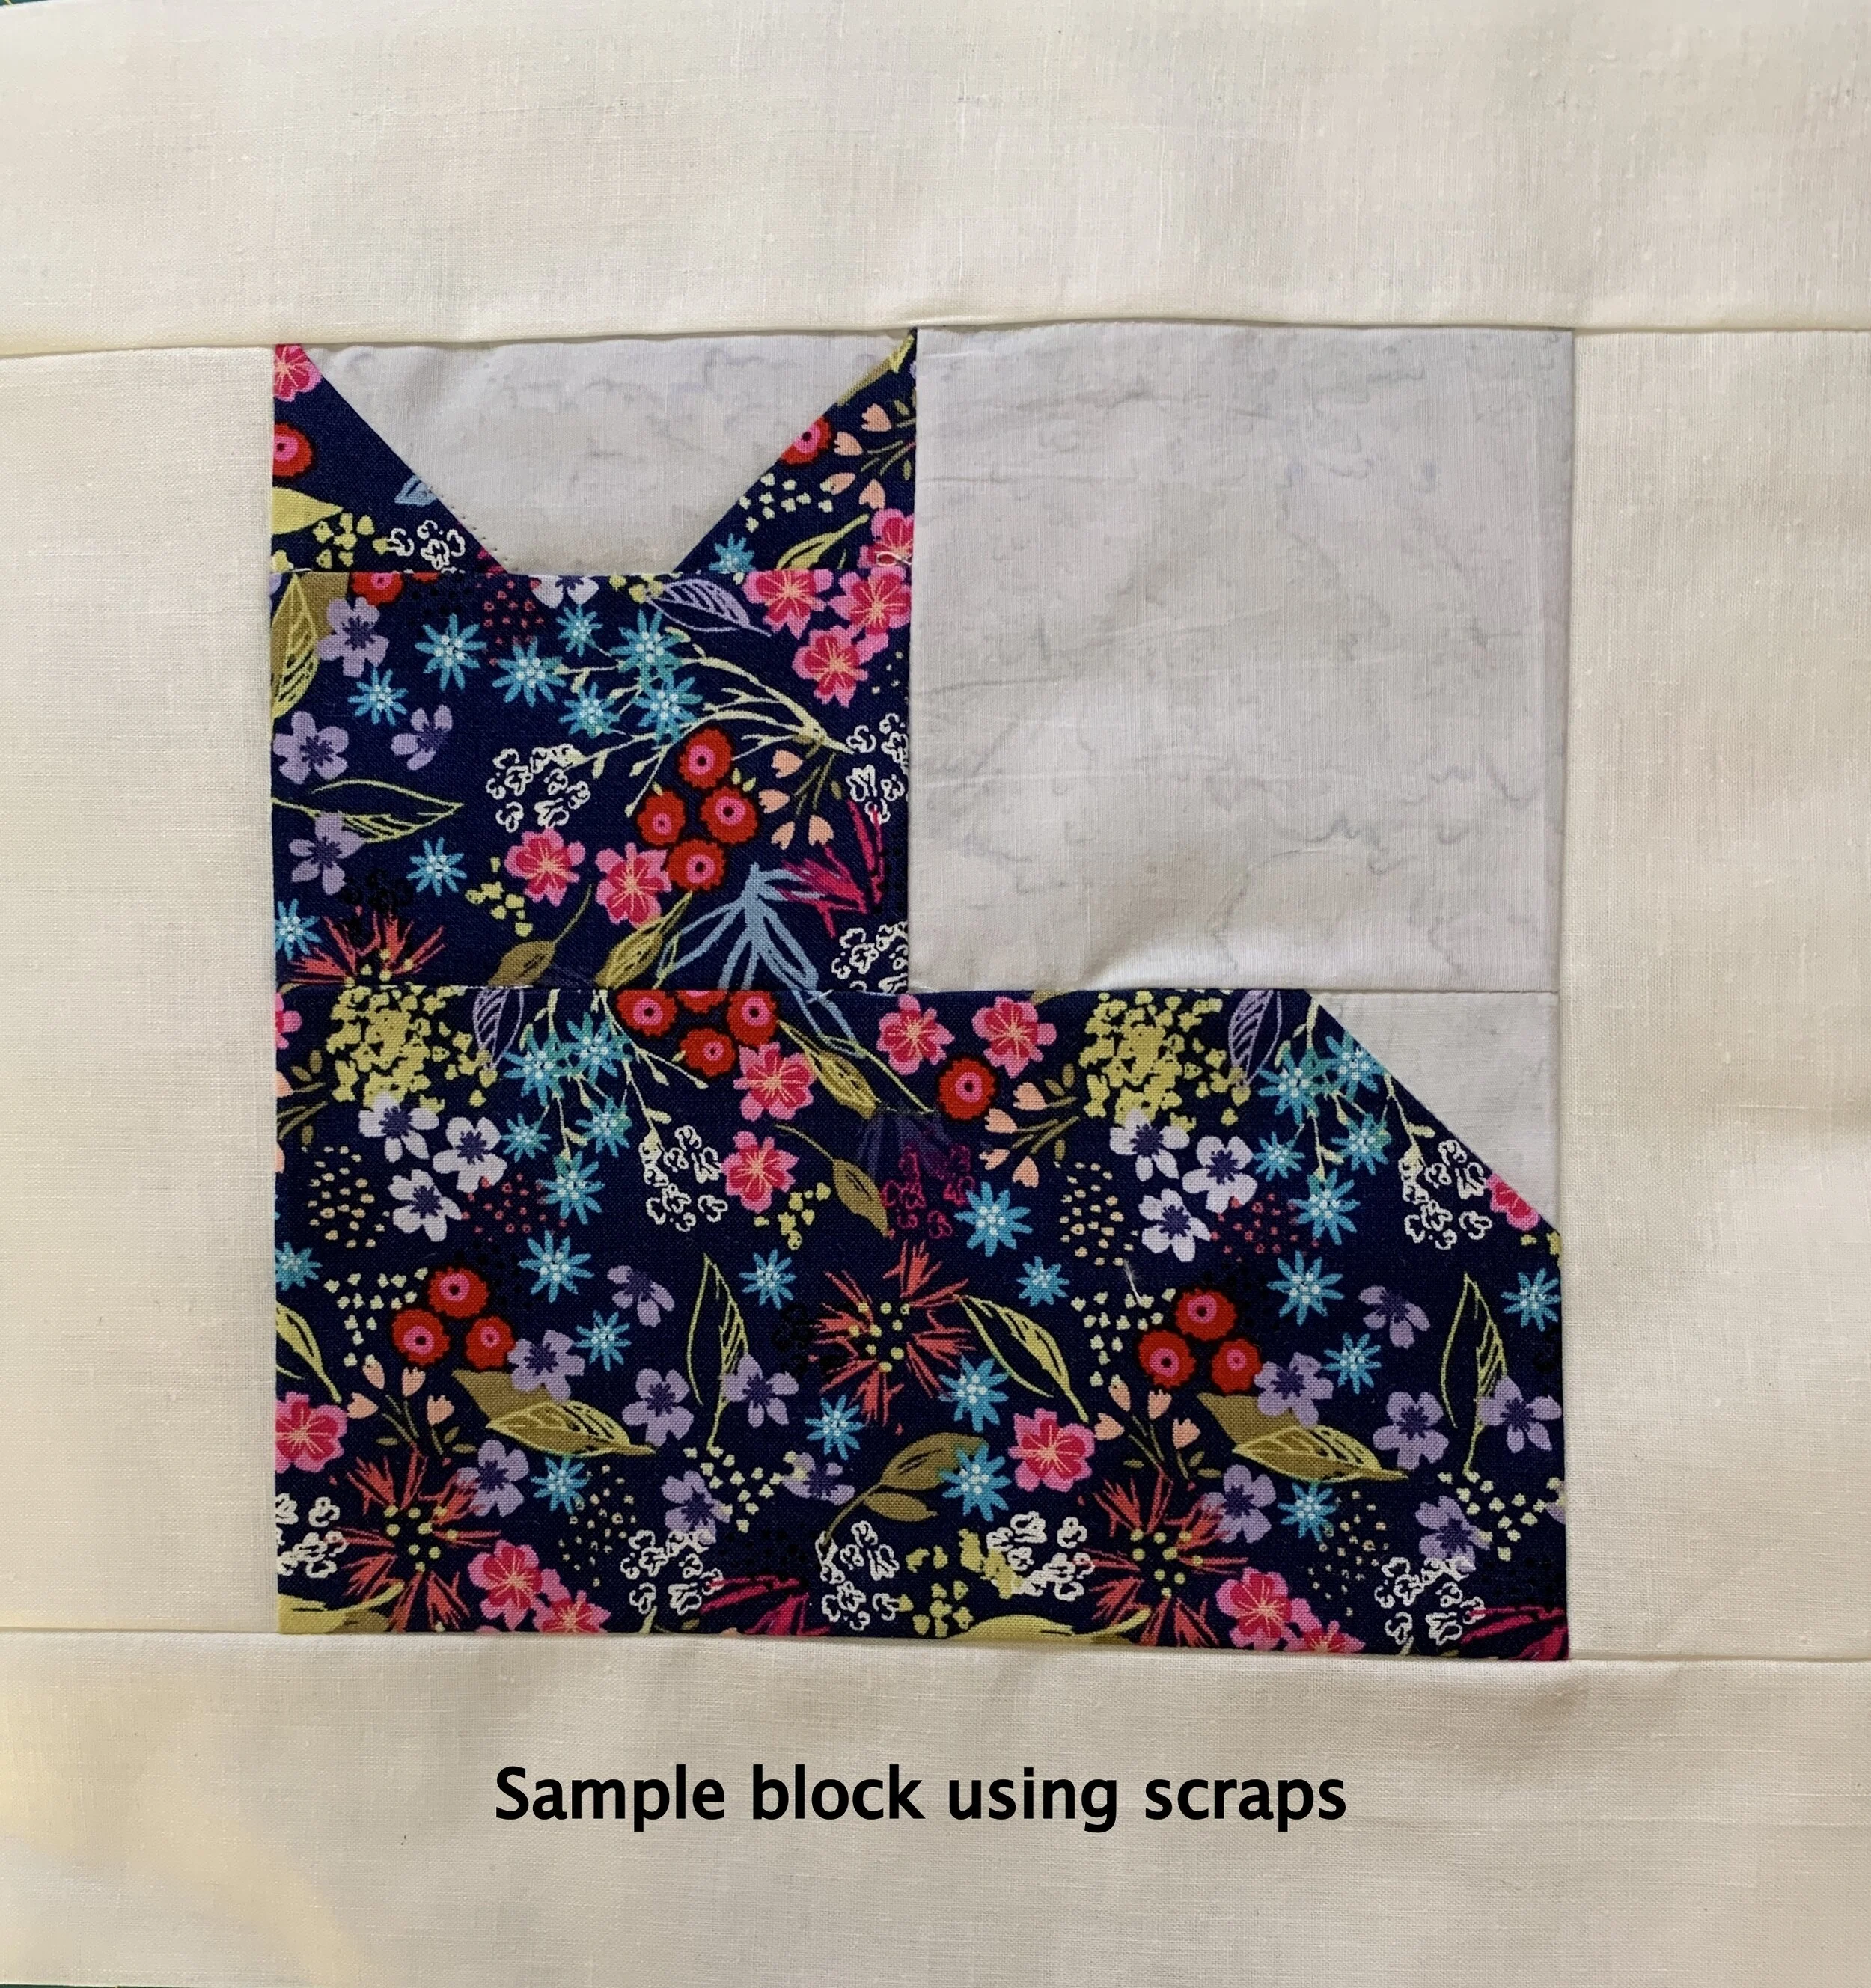
I wanted to get some practice in piecing (it needed improvement on the crib/baby quilt) and I thought the quilting I did was pretty boring to the eye. So I constructed a 12” block of a cat using scraps from earlier projects.
I also wanted to practice more interesting forms of the actual quilting process. I used some stitches that are pre-installed on my Singer Quantum Stylist 9960. That’s what you see in the second picture below. I have 600 different installed stitches on my machine so I’m sure I can find some nifty quilting stitching to embellish my quilts.
Next I’ll be practicing free-motion quilting (definition here). Angela Walters seems to be a leading instructor/practitioner of free-motion quilting and she has excellent books and video tutorials on the subject. She might have coined the phrase “practice makes progress” and I like that very much.

My First Quilt
My first quilt is now complete !! It is small and suitable for infants and small toddlers. You can see that our dog, Calliope, is awestruck (or perhaps it hurts her eyes 😉 ). The quilt looks better than I expected since I see every single mistake that I made—all of which are common for beginner quilters.
I learned several important lessons:
precise, exact measuring and cutting accurately is crucial to the process—even being off an eighth of an inch can multiply to an inch in the right (or wrong) circumstances
some fabrics have directionality — I discovered that when I saw that some blocks of cats were sideways. I had to purchase some more fabric and re-cut the blocks.
My next “project” will be using scraps (amazing how many scraps are created) to create two blocks. I’ll do my best to measure and cut accurately and join the two blocks to see how well I’ve done. I’ll be practicing free-motion quilting too.
Crib/Baby Quilt
I’ve been away for a while dealing with other projects but I’ve created my first quilt top (above), created the quilt “sandwich” (quilt top, batting and backing in solid yellow) and quilted the quilt (which probably sounds redundant but isn’t.
Not surprisingly I’ve made every single error that a new quilter makes. When I’m cutting the fabric if I’m off even an eighth of a inch on each block that translates to a full inch on each row or column. Additionally, the rows and columns don’t match up.
On the whole, I’m pretty pleased with the outcome. Next up is binding the edges of the quilt and then the quilt will be complete.
For my next project I’ll be creating some sample blocks to get more precision in my cutting and trying free-motion quilting. Stay tuned !!